Device Onboarding
Welcome to the device onboarding guide for pfManager. This guide will walk you through the process of configuring your pfSense firewall to work with pfManager.
Overview
Device onboarding involves configuring your pfSense firewall to allow secure SSH access from pfManager's servers, and then adding the device to your pfManager account.
Prerequisites
- Administrative access to your pfSense firewall
- SSH access enabled on your pfSense device
- Your pfSense device's public IP address or FQDN
- SSH credentials (username and password, or SSH key)
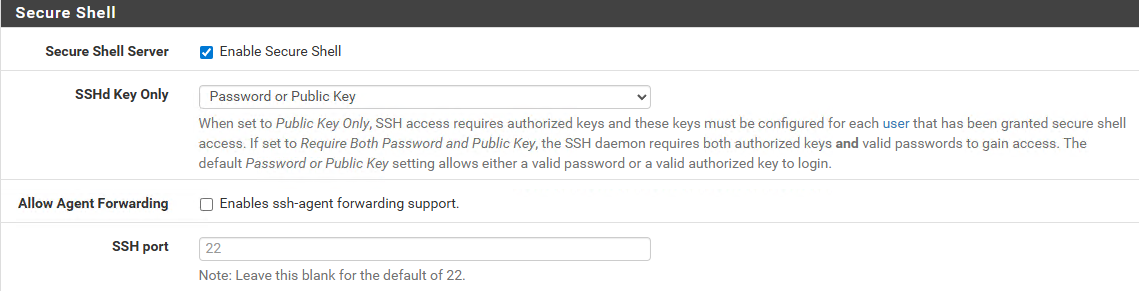
Step 1: Enable SSH on pfSense
- Log into your pfSense device web interface
- Navigate to System > Advanced > Admin Access
- Scroll down to the "Secure Shell" section
- Check the "Enable Secure Shell" checkbox
- In the "SSHd Key Only" dropdown, select one of the following:
- Password or Public Key (recommended) - Allows either password or SSH key authentication
- Public Key Only - Requires SSH keys configured for each user
- Require Both Password and Public Key - Requires both authentication methods
- Scroll down and click Save
Step 2: Create Firewall Aliases
Create SSH Servers Alias
- Navigate to Firewall > Aliases > IP
- Click the Add button
- Configure the alias:
- Name:
pfManager_SSH_Servers - IP or FQDN: Add the following two entries:
ssh01.pfmngr.comssh02.pfmngr.com
- Name:
- Click Save
Create Ping Servers Alias (Optional)
If you plan to enable uptime monitoring by ping in pfManager, create an additional alias:
-
In Firewall > Aliases > IP, click Add
-
Configure the alias:
- Name:
pfManager_Ping_Servers - IP or FQDN: Add the following two entries:
ping01.pfmngr.comping02.pfmngr.com
- Name:
-
Click Save
-
Click Apply Changes to apply the alias changes
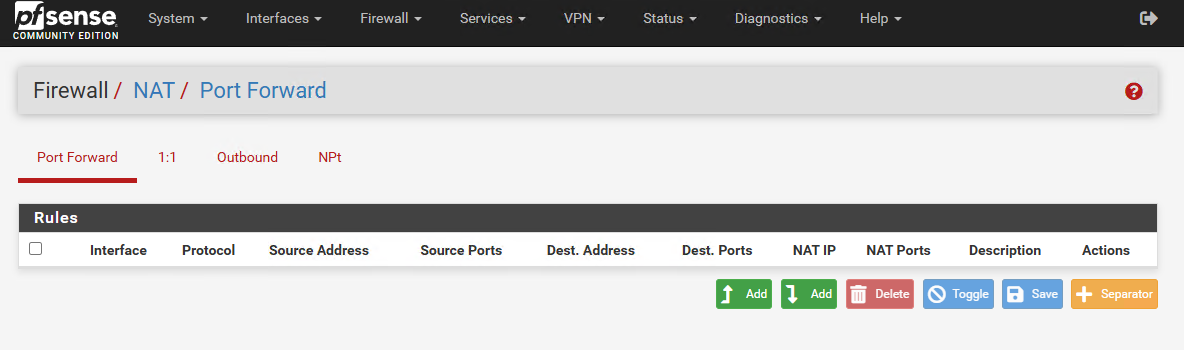
Step 3: Configure Port Forwarding Rules
Create SSH Port Forward Rule
- Navigate to Firewall > NAT > Port Forward
- Click the Add button (arrow up icon)
- Configure the port forward rule:
- Interface:
WAN - Address Family:
IPv4 - Protocol:
TCP - Source (click "Display Advanced"):
- Source:
Address or Alias>pfManager_SSH_Servers - Source port range:
Any
- Source:
- Destination:
WAN address - Destination port range:
Other(enter52001to52001) - Redirect target IP:
WAN Address - Redirect target port:
SSH - Description:
Allow SSH access for pfManager servers
- Interface:
- Click Save
Create Ping NAT Rule (Optional)
If you enabled ping monitoring, add the following NAT policy:
-
In Firewall > NAT > Port Forward, click Add
-
Configure the rule:
- Interface:
WAN - Address Family:
IPv4 - Protocol:
ICMP - Source (click "Display Advanced"):
- Source:
Address or Alias>pfManager_Ping_Servers - Source port range:
Any
- Source:
- Destination:
WAN Address - Redirect target IP:
WAN Address - Description:
Allow Ping from pfManager servers
- Interface:
-
Click Save
-
Click Apply Changes to apply the NAT rules
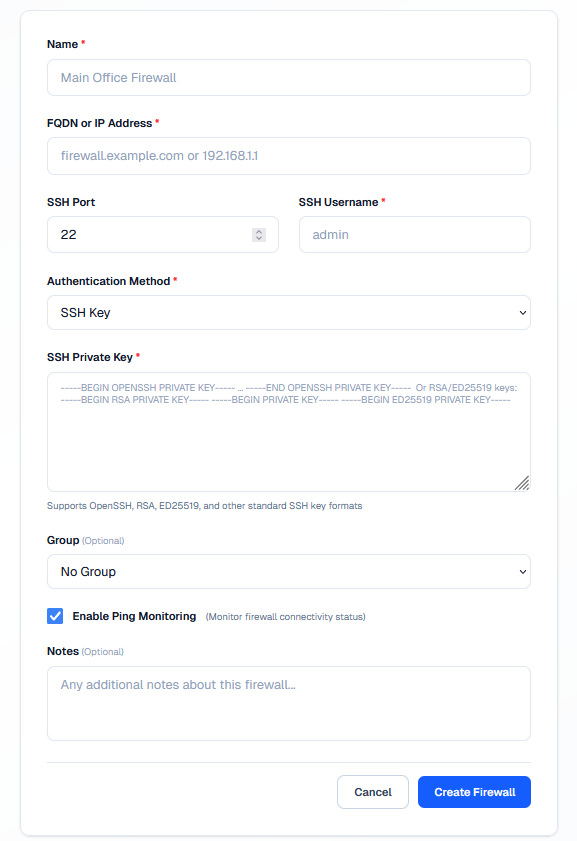
Step 4: Add Device to pfManager
- Log into pfManager at https://app.pfmngr.com/firewalls
- Click Add Firewall or Add New Device
- Fill in the device information:
- Name: Enter a descriptive name for your firewall (e.g., "Main Office Firewall")
- FQDN or IP Address: Enter your firewall's public IP address or FQDN
- SSH Port: Enter
52001(the port you configured in the port forward rule) - SSH Username: Enter the SSH username (typically
admin) - Authentication Method: Select either:
- Password: Enter your SSH password
- SSH Key: Paste your SSH private key
- SSH Private Key (if using SSH Key): Paste your private key in one of these formats:
- OpenSSH:
-----BEGIN OPENSSH PRIVATE KEY----- - RSA:
-----BEGIN RSA PRIVATE KEY----- - ED25519:
-----BEGIN ED25519 PRIVATE KEY-----
- OpenSSH:
- Group (Optional): Select an existing group or create a new one
- Enable Ping Monitoring: Check this box if you configured the ping alias and NAT rule
- Notes (Optional): Add any additional notes about this firewall
- Click Create Firewall
Verification
After adding your device:
- Verify the device appears in your pfManager dashboard
- Check that the connection status shows as "Connected" or "Online"
- If ping monitoring is enabled, verify uptime monitoring is working
- Test SSH connectivity from pfManager to your device
Troubleshooting
SSH Connection Issues
- Verify the port forward rule is correctly configured and applied
- Check that the SSH alias includes both
ssh01.pfmngr.comandssh02.pfmngr.com - Ensure SSH is enabled in System > Advanced > Admin Access
- Verify the SSH port (52001) matches in both the NAT rule and pfManager configuration
- Check firewall logs for blocked connections
Ping Monitoring Issues
- Verify the ping alias includes both
ping01.pfmngr.comandping02.pfmngr.com - Ensure the ICMP NAT rule is configured and applied
- Check that "Enable Ping Monitoring" is checked in pfManager
Authentication Issues
- Verify your SSH username and password/key are correct
- If using SSH keys, ensure the key format is correct
- Check that the SSH authentication method matches your pfSense configuration
Next Steps
After successfully onboarding your device, you can:
- Configure firewall rules and policies
- Set up automated backups
- Monitor device status and uptime
- Apply group policies to multiple devices
- Schedule maintenance windows